FOMS APP 001

PHOTO: FOMS
This is our first FoMS application. It is a kind of Hello, world! application, with a slightly different approach. The goal is to show you how to create a very simple app, how to start it, how to sent a HTTP request by Postman and how to customize your response by defining and using variables in the Mule app flow. You can download the application here.
The prerequisites
In order to understand this app, you need to have the knowledge from the following article:
- The Prerequsits for Free Friends of MuleSoft Apps
Used elements
In this example app, we will be using the following components:
- HTTP Listener
- Set variable
Step 01
For the beginning, start Anypoint Studio! Select File > New > Mule Project and enter foms001-hello-world in the Project Name input field, as on the picture down below. Press Finish button to create and open your new Mule project in Anypoint Studio IDE.
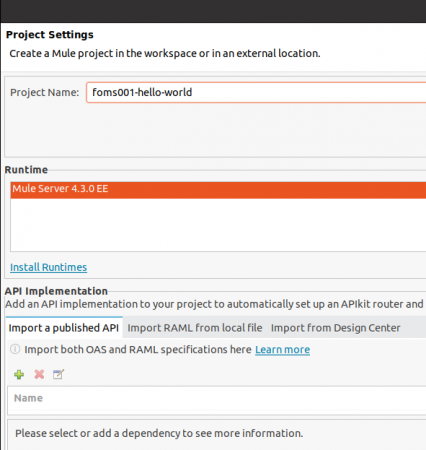
PHOTO: NEW MULE PROJECT
Step 02
If you have done everything correctly in the previous step, you should now be able to see your empty project opened in Anypoint Studio, as on the following picture.
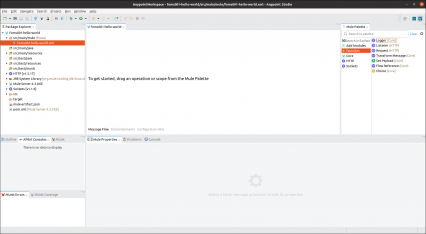
PHOTO: EMPTY MULE PROJECT IN ANYPOINT STUDIO
You will find Mule Palette in the upper right part of Anypoint Studio. There you can find components (connectors, modules,...) that you will be using as elements of a flow. Each Mule app is made of flows and components in it. It is not possible to put a component in a Mule App, that would not be in a flow. In the same time, you can understand flows as placeholders for the components that you will be using in your apps.
For the beginning, let's select one of those components.
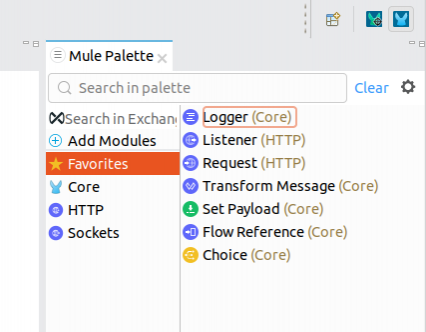
PHOTO: MULE PALETTE
Click on the Listener (HTTP) component to select it. If you do not see this component in Mule Palette, use search field to find it. By using drag and drop method, add the Listener on the main part of your Anypoint Studio IDE, called the Message Flow. Since you are putting your first component on the Message Flow, Anypoint Studio is going to add one flow for you, because, as already mentioned, you can not have a component outside a flow. If you have followed FoMS naming conventions, by default your flow should have a name foms001-hello-worldFlow.
In some more advanced examples of FoMS apps, you will learn how you can access a Mule app by using other methods, but for our first app we have decided to start with the HTTP Listener, since we assume that you already know a thing or two about HTTP request and since it is the easiest way to illustrate how Mule gets and understands variables.
Step 03
To be able to access your Mule app, you will have to configure its path. Let us assume that you are developing on your PC where you have installed Anypoint Studio. That would imply that your Mule apps would be accessible behind an URL that looks like
http://localhost:8081/path
where path represents entrance to your app. This path is being defined in the configuration of the HTTP Listener. Each component, when clicked, gets its specific configuration shown in the bottom part of Anypoint Studio IDE. HTTP Listener configuration has more than one category.
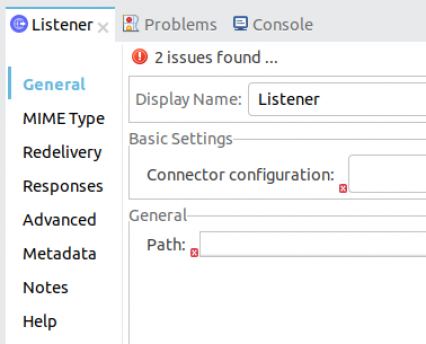
PHOTO: HTTP LISTENER CONFIGURATION
In the Basic Settings part there is an empty drop-down list called Connector Configuration. On the right side of this drop-down list, there are two icons: a plus (add) icon and an edit icon. In order to understand this part of the configuration, you need to grasp that this Connector Configuration is not only a part of the HTTP Listener configuration. That means that if you decide to add another HTTP Listener later during the development of your Mule app, the drop-down list of the Connector Configuration is going to be shared or better to say the same in every HTTP Listener. That implies that the Connector Configuration is more on the level of the app, and when you create one, you can use it in any HTTP Listener in the app.
Now click a plus icon to add a new Connector Configuration for the app. Enter foms001 in the Base Path field. If you leave this field empty, you path to the app is going to be defined by the HTTP Listener path only, but we would not recommend it. It is a good practice to separate paths between apps on the same machine. In this case, this foms001 is kind of a prefix for every possible path that we might want to have in the FoMS App 001. Click OK to save the configuration and to close the window. In this moment, your app is defined to be behind the http://localhost:8081/foms001 URL.

PHOTO: CONNECTOR CONFIGURATION
Enter startpoint in the input field Path in the section General of the HTTP Listener configuration. Your first FoMS application is now accessible behind the URL
http://localhost:8081/foms001/startpoint
Click on the MIME Type category and choose "text/plain".
Step 04
Use Mule Palette to search and find Set Variable component and drag and drop it right next to the HTTP Listener that is already in the flow. Right after putting the component in the flow, its configuration is being shown down below. Enter tutor in the Name field and FoMS in the Value field. If you do not see the Set Variable component configuration panel, just click once on the Set Variable connector and wait a few seconds, since Anypoint Studio is not always the fastest IDE you can wish for. Click on the MIME Type category and choose text/plain.

PHOTO: SET VARIABLE CONFIGURATION
Step 05
Use Mule Palette to add another Set Variable component and put it after the first Set Variable that is already in the flow. Enter city in the Name field and attributes.queryParams['city'] in the Value field. Press fx button located right next to the Value input field, to switch from literal to expression mode. Every time when you will be putting some code in the Value field, you should turn the expression mode on. This mode is going to add #[ ] around your code, which is necessary according to the DataWeave syntax.
To fully understand attributes.queryParams['city'] syntax, you should read the DataWeave documentation. In essence, attributes is a part of the Mule Message architecture, where you can obviously find an array called queryParams, which again has an index called city. By using this syntax, we are catching a query parameter named city from the HTTP request.
Click on the MIME Type category and choose text/plain.
Step 06
Now we would like to customize our response in a way that you see various kind of variables that you can have in a Mule app. Until now you have seen a variable created in a flow (vars.yourVariable) and you have seen a query parameter sent through a HTTP request (attributes.queryParams['yourQueryParameter']).
One of the most common variables that you will use in Mule apps is so called payload. Payload is exactly as its name tells you - it is a payload that your Mule app is going to receive and you will need to do something with it, most of the time anyhow.
As we mentioned, we will be using HTTP request, to send a message through the flow. When using HTTP request, the content of the body of the HTTP request is going to become a payload in your Mule app.
Click on the Listener and in its configuration panel, click on the Responses category.

As you can see on the picture, inside the body of the HTTP response(!), there is a variable payload. This is a (misleading) default setup, but we can chose what we want to send as our response. For example, we could send OK or even a Hello, world!, so we decided to send a concatenated string with three different kind of variables, to illustrate you the possibilities you have in a Mule app. Replace the variable payload in the body with the following code:
vars.tutor ++ ": Hello " ++ payload ++ " from " ++ vars.city ++ "!"
In Mule app ++ is a string concatenation operator, vars.tutor is our first variable defined in the flow with a name tutor and a simple string as its content, vars.city is also a flow variable, but its content is the content of the query parameter city of the HTTP request and the payload is the content of the body of the HTTP request.
As you can notice, by not sending you a Hello, world! in a response, we have taught you three kinds of variables, already in your first Mule app.
Step 07
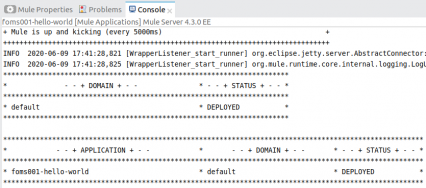
Your first Mule app has been created. Now you need to start it. Before you do it, make sure you have a Console opened in your Anypoint Studio (Window > Show View > Console). Start your foms001-hello-world application by selecting Run from the Run menu or by pressing CTRL + F11. When the app has been started, search in the Console for the word DEPLOYED. Your Console should look like the one on our picture below.
Step 08
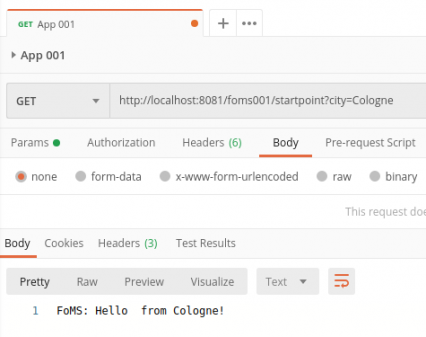
Now it is time to use Postman. Let us define an URL, a query parameter and the body of the HTTP request. In the address bar enter the local URL of your Mule app. If you have used all our examples to the letter, your URL should be exactly this:
http://localhost:8081/foms001/startpoint
Define one query parameter named city with a value Cologne. Click on the body tab, select raw checkbox and put John in it. Click on Send button and wait for the response of the Mule app. The following picture is what you should now see in front of you.
The conclusion
Congratulations! You have successfully created your first Mule application. In this example we tried to show you the basic usage of a Mule app and we have tried to avoid every obstacle that we had, while creating this example. We hope you liked it. More FoMS apps are coming up soon, so stay tuned!
What is Postman?
Postman is a tool that can help you to test calls to APIs. In essence, you enter some data in it to create a HTTP request. Then you send the data to the URL that you have entered and the response that you got from the URL is being show in Postman to you.
RELATED ARTICLES
OTHER ARTICLES

LATEST FORUM UPDATES
APIAmeeth, Thursday, 1.9.2022 / 21:23
Jay-Catalyst, Tuesday, 2.11.2021 / 10:48
Matteo, Friday, 3.7.2020 / 16:30
Matteo, Friday, 3.7.2020 / 16:29
Matteo, Friday, 3.7.2020 / 16:28
Caio S Cavalcante, Friday, 22.5.2020 / 16:59
Edo Schatz, Thursday, 21.5.2020 / 13:50
Edo Schatz, Thursday, 21.5.2020 / 11:29
Edo Schatz, Wednesday, 20.5.2020 / 18:18
Edo Schatz, Monday, 18.5.2020 / 16:33
NEW ARTICLES
POPULAR ARTICLES